|

|
ChicagoNet
Connection Manager
|
Settings Menu
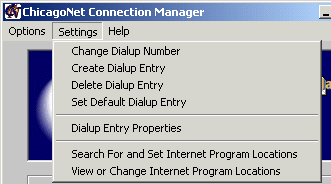
I. Change Dialup Number
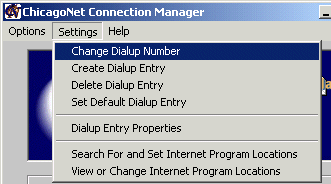
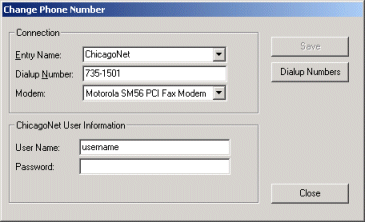
- The Change Phone Number menu item will allow you to
change the Dialup Number, Modem, User Name, and Password in
a specific entry.
- Note: Changing the Password will not
change your password in ChicagoNet's database.
To change your password in ChicagoNet's database,
see Customer Utilities.
- Note: Users running Windows XP or Windows 2000 must
reenter their passwords before they are allowed to save.
Windows ME/98/95/NT users will have their password already
present.
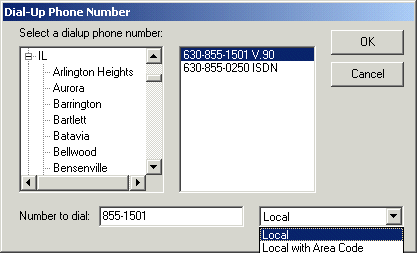
- Clicking the Dialup Numbers button will open the Dialup
Number Database and will have listings for all ChicagoNet
dialup numbers. Simply select your state and town (or
nearest town if your is not listed). Numbers ending in
V.90 are for normal modems over normal telephone wires.
Numbers ending in ISDN are for special digital modems and
digital lines that must be installed in your house. Select
the number appropriate for your setup.
- Note: Some area codes may require you to dial
1+areacode for local numbers as well. Most numbers in the Dialup
Number Database have been updated to this if necessary;
however, if it is not displayed for your number and is required
in your area, select the drop down menu labeled Local
then select Local with Area Code.
- Click Save to save your changes.
II. Create Dialup Entry

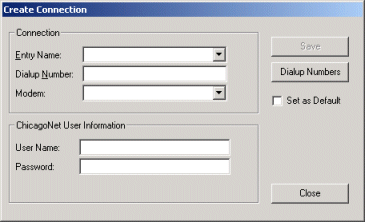

- The Create Dialup Entry menu option is for saving new
dialup entries to your computer.
- Note: Creating a Dialup Entry with a new
username and password will not work unless you have Registered
a new account with ChicagoNet.
- Enter a unique Entry Name for your account in the top
box. You may not name two accounts the same name.
- Enter your dialup number or click the Dialup Numbers
button to select one from the Dial-Up Phone Number
window. Simply select your state and town (or
nearest town if your is not listed). Numbers ending in
V.90 are for normal modems over normal telephone wires.
Numbers ending in ISDN are for special digital modems and
digital lines that must be installed in your house. Select
the number appropriate for your setup.
- Note: Some area codes may require you to dial
1+areacode for local numbers as well. Most numbers in the Dialup
Number Database have been updated to this if necessary;
however, if it is not displayed for your number and is required
in your area, select the drop down menu labeled Local
then select Local with Area Code.
- Select your modem from the Modem drop down box. Do
not select the WAN Miniport or the Direct Parallel connections.
Most modems will be listed at the very bottom of the list.
- Enter the Username of the account you wish to add in
the second box to the bottom.
- Enter the Password of the account you wish to add in
the box on the very bottom.
- If you wish to set this account as the Default Dialup
Account, check the box. Your old Default will
no longer immediately pop up for use, but will not be deleted.
- Click the Save button to save the new account.
III. Delete Dialup Entry
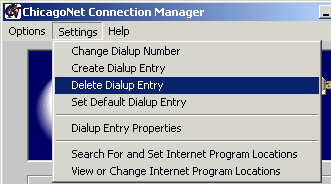
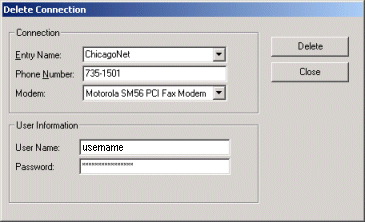
- The Delete Dialup Entry menu item will allow you to
delete a Dialup Entry. This will permanently remove
a Dialup Entry from your computer and the Connection Manager.
- Click the small arrow to the right of the Entry Name
list box. Next select the name of the Dialup Entry
you wish to delete. Once you are sure that you have
selected the correct Dialup Entry, click the Delete
button. You must click the Yes button in the
conformation box to delete the entry. After the
conformation box disappears, click the Close button if
there are no more entries to be deleted.
- Note: Changing any settings to any Dialup Entry
will not save the changes no matter what button is
pressed. To change the saved settings of a Dialup Entry,
use the Change Dialup Number menu item located in the Settings
menu.
IV. Set Default Dialup Entry
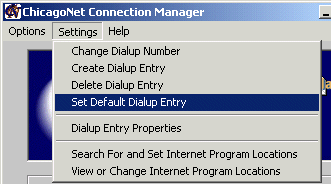
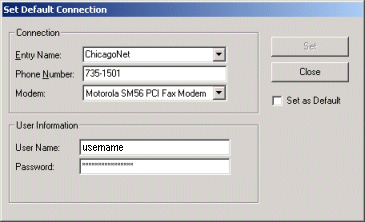
- The Set Default Dialup Entry menu item will allow you
to change which Dialup Entry is the primary entry.
- To change the Default Dialup Entry, choose the proper Dialup
Entry by click the small arrow to the right of the Entry
Name drop down menu. Then select the Dialup Entry
you wish to make the Default Dialup Entry. Next,
check the box marked Set as Default located just below
the Close button. Click the Set button to
save the new Default Dialup Entry.
- Note: Changing any settings to any Dialup Entry
will not save the changes no matter what button is
pressed. To change the saved settings of a Dialup Entry,
use the Change Dialup Number menu item located in the Settings
menu.
V. Dialup Entry Properties
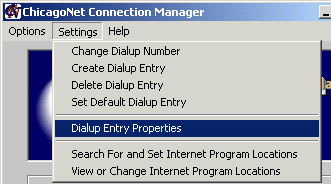
- The Dialup Entry Properties menu item will open up the Dialup
Properties window of your connection in the Windows
Operating System. The Properties window you will see
will depend on your Operating System
(XP/2000/ME/98/95/NT).
- Normally you would not need to change these settings, but a ChicagoNet
Technical Support Staff Member may ask you to enter this
screen to change settings if your connection is not
functional. Refer to your Windows Help Documentation
for more information on the Dialup Properties window.
- Note: The ChicagoNet Connection Manager will
close after selecting this option and will not reopen until you
manually do so. This is to ensure that any changed
settings are saved correctly within Windows and the ChicagoNet
Connection Manager.
VI. Search for and Set Internet Program Locations


- The Search For and Set Internet Program Locations menu
item will automatically search your computer for your Internet
Explorer and Outlook Express locations so you may use
them for the Open Internet Explorer on Connect option and
the Quick Launch Buttons located at the top of the Connection
Manager.
- Simply click on the Settings menu, then select the Search
For and Set Internet Program Locations menu item.
Click the OK button to start searching. It may take
a few moments to located the programs. If the programs
have been found, a message box will alert you. Click OK
on any message boxes that pop up.
- Note: This will not locate your FTP
program. If you would like to change your FTP program,
you must do this manually. See View or Change Internet Program Locations.
VII. View or Change Internet Program Locations
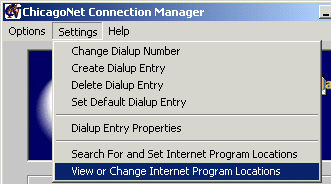
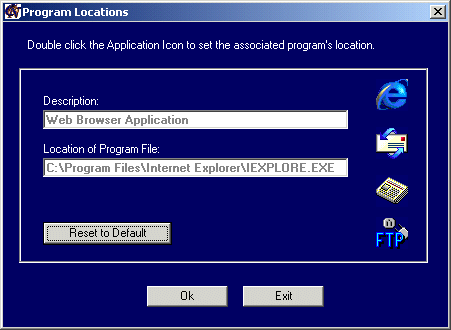
- The View or Change Internet Program Locations menu item
will allow you to manually change the Internet Program
Locations for the Quick Launch Buttons located at the
top of the Connection Manager.
- Click the Settings menu and then click on View or
Change Internet Program Locations. A blue Program
Locations window will pop open. Simply double click
the appropriate icon and find the location and .exe file
of the program used for it. Click OK to save your
changes once finished.
- The Reset to Default will reset the program locations
to ones originally set upon installation of the Connection
Manager.
Back to the Menu
and Settings page
|
Email: Webmaster@ChicagoNet.net
Revised: May 1, 2002
ChicagoNet • 780 W. Army Trail
Road• PMB 153 • Carol Stream, IL • 60188
708-656-6900 Copyright © 1995-2002 ChicagoNet All Rights Reserved Worldwide
|


